Customizing The Refinement Panel for SharePoint 2010 Search

One of the quickest and easiest ways to begin customizing the search experience with SharePoint 2010 is to customize the refinement panel web part. If you’ve aren’t familiar with what I’m talking about it is web part that shows on the left hand side of search results page. Each of the sections, are ‘refiners’ which are basically just metadata – and below each refiner the available values that have been entered for content that is being returned in your search result.  In this screenshot you’ll see the refinement panel that was displayed when I did a search for ‘contoso’

image

What is being shown in the screenshot is the default refiners that are displayed for SharePoint search.  The refiners allow me to perform a very general search and then click on the refiners to basically filter my results.  I can start with a very broad search and then keep refining until I get to what I’m looking for.

But in many organizations, they might want to display their own values here instead of the out of the box ones.  The refinement panel uses XML to display the results, so if you wanted to change what you see – it only takes a few steps.

1) Go to your search results page in your Search Center and put it in edit mode.  Then edit the Refinement Panel web part.

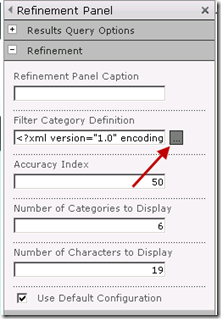
2) Expand the ‘Refinement’ section.  After the field that says ‘Filter Category Definition’ click the ellipsis button which will bring up an editor that allows you to more easily see the code.

image

I know, there’s no formatting for the XML. It is pretty terrible to look at.  You can try to parse it out on your own if you enjoy that kind of thing.  I don’t – I’ve found the easiest way to clean up the code is to paste it into Visual Studio 2010.  I’ve experimented with a few other editors, and Visual Studio 2010 is the best one. 

3) Assuming you are us VS2010, you can open up any project (or create a new one) and Add a New Item.  Choose to add an XML file (under the data section).  You can name it whatever, because you don’t really need to save it. Then paste your code in and it will all be automagically formatted for you!

QUICK TIP!  Visual Studio will add the following code to any new XML file: <?xml version=”1.0” encoding=”utf-8”?>  You’ll want to remove this before you paste your code in. If you don’t, it will cause the Refinement Panel to error because that line is already included in the XML you are pasting in from the web part.  SharePoint doesn’t like it if it sees two of those lines at the top of your XML.

4) This is going to be a very basic example and we are going to configure the refinement panel to only show the Author refinement.  To do this we want to everything inside the <FilterCategories> tag except line 85.  In other words, when you are done your XML should look like this:

<?xml version="1.0" encoding="utf-8"?>
<FilterCategories>
  <Category     Title="Author"     Description="Use this filter to restrict results authored by a specific author"     Type="Microsoft.Office.Server.Search.WebControls.ManagedPropertyFilterGenerator"     MetadataThreshold="5"     NumberOfFiltersToDisplay="4"     MaxNumberOfFilters="20"     SortBy="Frequency"     SortByForMoreFilters="Name"     SortDirection="Descending"     SortDirectionForMoreFilters="Ascending"     ShowMoreLink="True"     MappedProperty="Author"     MoreLinkText="show more"     LessLinkText="show fewer"     />
</FilterCategories>

It should be pretty obvious what most of the tags do here – but the most important one is MappedProperty.  In this case, the refiner is looking at the Author managed property.  But really you could set this to be whatever you wanted. So if you had a custom field that you wanted to refine on, no problem!  All you’d need to do is add a managed property, and copy/paste the line in the XML which defines the Author refiner, and rename it to match the name of your managed property.  Obviously update the other values too – like title and description. 

Don’t know how to create a managed property?  Check out my blog post on the topic:

http://www.sharepoint911.com/blogs/john/archive/2011/03/18/creating-custom-managed-properties.aspx

5) Copy and paste your new XML from VS2010 back into the text editor in SharePoint. Then his the OK button on the text editor.

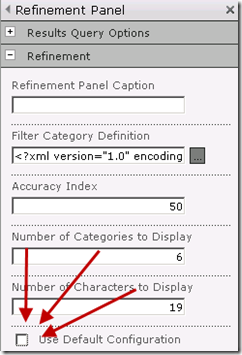
6) Now here’s the tricky part that trips people up.  Before this will work you need to remove the check from the box at the bottom of the ‘Refinement’ section in the web part properties that says ‘Use Default Configuration’ – if you don’t do this, your changes will not be applied!

image


7) On the web part properties panel, hit the Ok button.  Then you’ll need to press the Check In button on the ribbon.

8) Run a new search and you’ll see that your refinement panel has been customized!  If you don’t see results, there could be a couple reasons why. First, make sure that there’s enough items being returned in the search which contain the refiner you are looking for. I’m not sure of the exact number needed, but generally at least 5 will do the trick.  Second, if that isn’t the issue you might want to double-check your XML.  It is very unforgiving by nature.

image

This is one of the more common search customizations I’m doing these days for clients.  As a final thought, my recommendation is that if you plan on a field being used as a refiner it is best if it isn’t free-text.  That means something like a Choice or Managed Metadata field works best. 

The other tip I’d suggest is when customizing the refinement panel, don’t try to do 50 refiners all at once.  It never seems to end well.  I suggest starting with a couple, confirm they work, and then add a few more.  Repeat that until you are done.  Slow and steady win the race!

Final thought – remember you can always just add the out of the box refinement panel to the page if you want to get back to the original.  Or, just go back into your custom web part and check the box again to use the default configuration. Just remember if you check that box again it will overwrite the changes you made to the XML so you’ll have to start over again to reapply your changes.  That’s why once I get my refinement panel web part customized the way I like it – I export it out just in case!

Creating Custom Managed Properties

I speak frequently on the topic of search at various conferences, and one of the challenging parts about this subject is that many of the demos simply take a lot of time.  For example, if I wanted to do a demo about to show how users could search on their own custom fields it would require that I subject the audience to sit there while I run some indexes.  Which is no fun to watch, and I simply don’t have enough bad jokes to keep an audience entertained for more than 30 seconds at the most. 

I’m writing this post as a way to provide the steps required to do that demo for creating your own custom fields.

Quick Summary:

-Create a field in a list or document library. 

-Make sure some items in the list or library have the field and it is filled out.

-Run an incremental crawl to add the field into the index as a crawled property.

-Create a managed property.

-Run a full crawl.

-Wait patiently.

-Enjoy searching on your new managed property.

Longer Explanation:

1) The first step is to create a list or document library with at least one custom field in it.  In my case, I’ve added a column to an existing list called ‘Type of Document’ and made it a Choice field.  This was a very deliberate choice – in larger organizations a Managed Metadata field has a lot of benefits for this type of scenario, but in my case I’m trying to move this along as quickly as possible.  Managed Metadata fields can’t be updated in the datasheet view.  Choice fields can be. And we need the fields to be quickly filled with information so we can then index it….but let’s not get ahead of ourselves.

2) Make sure you’ve got some items in list or document library and using the datasheet view populate the values of your new field. You should be able to select a value and then just like in Excel, click the box in the bottom right corner and drag down to fill the cells below:


image

3) Once you’ve filled in some data, the next step is to go to your Search Service Application in Central Administration (Application Management > Manage Service Applications > Search Service Application) and kick off an index.  You can do this by clicking Content Sources from the left navigation.  Then click the dropdown next to Local SharePoint Sites and select Start Incremental Crawl (this assumes you’ve already done a full crawl at some point – if not then click Start Full Crawl)

image


On my dev server (without much content) and incremental crawl took anywhere from 2.5 minutes to almost 6 minutes.  This is exactly why I don’t demo this live! 

4)  Once it completes, from the left navigation click on Metadata properties. The from the toolbar across the top click Crawled Properties:

image

5)  To quickly find my new custom column, I typed in ‘type’ into the search box at the top and hit the green arrow.  There were several results that came but, but the one I’m looking for is called": ows_Type_x0020_of_x0020_Document(Text). We aren’t really doing anything special in this step – just proving that our new column got indexed.

image

I know, it has a strange looking name.  This is the internal name for the field.  But we are going to take care of that in the next step.

6) The next thing we are going to do, is create a Managed Property which will take care of that strange looking name for the crawled property.  From the toolbar at the top, click on Managed properties and then New Managed Property.

From the New Managed Property Page fill in the following information into the fields:

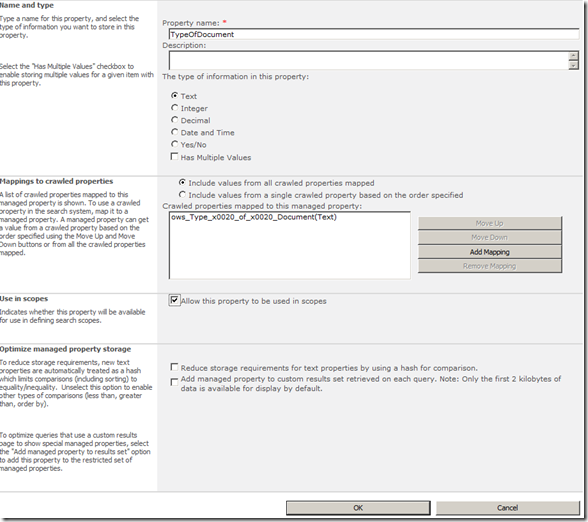
Property name: TypeOfDocument

Type of information in this property: Text

To map our column, press the Add Mapping button and in the Crawled property name field enter ‘type’ and press find.  This is about the same process you’d have followed in step 5. Once you’ve located the field, select it and press Ok.

image

You’ll see that the field mapping has now been added to the Mapping to crawled properties field on the New Managed Property page.  Next, place a check in the box to Allow this property to be used in scopes.  Then once complete press OK.  The page should look like this:

image

7) Now, go back to your site.  You can test to see if your managed property works by typing in the following into your search box – make sure you are using the All Sites scope: TypeOfDocument:HR

image

You’ll notice that it doesn’t return any results. That’s because in order for our managed property to work, we’ve got run (another) crawl.  But this time, an incremental crawl isn’t going to work – we’ll have to run a full crawl.  In my case, this took just slightly more than 33 minutes – which brings the total time spent indexing to about 38 minutes. Definitely not something that would make for a great demo to have to watch.

When the full crawl completes, if you run the same query above you’ll get results this time.  That type of query syntax we used for the search is called a restriction.  What we are doing is only searching against our managed property we created for documents that contain HR.  If you happened to have a value such as Human Resources to accommodate for the space, you’d need to enclose the string in quotations like this:  TypeOfDocument:”Human Resources”

Next Steps

Once you’ve created a managed property there’s several other things you can do.  You could create custom search refiners, scopes, customize search results, or even use it to create custom search applications.  But that is the topic of another blog post. 

FAST Search for SharePoint Error: Unable to resolve Contentdistributor

I’ve been working on a custom search project recently and ran into an issue that had me scratching my head.  My FAST Content SSA wasn’t able to crawl successfully crawl content.  When I kicked off a full crawl it wouldn’t fail, but it would continue to run until I manually stopped it, never returning a single error, warning, or anything.  When I looked at the Event Viewer on the SharePoint Server I saw this:

Log Name: Application
Source:    SharePoint Server Search
Event ID:  2567
Task Category: Content Plugin

General: Failed to connect to servername.com:13391 Failed to initialize session with document engine: Unable to resolve Contentdistributor

I’ve solved this problem several times before, either by updating the certificate that SharePoint and FAST use to talk to each other or updating the port number listed for the content distributor. In fact when you search on this issue, that’s going to be what you are going to find as the most common solutions.  Apparently, in this case it was special.

It turns out there’s another reason why you get this issue – and that is because the user ID used to run the scripts to apply the SSL certificates needs to be same as the one that is listed for the SharePoint Search Service.  Once I realized this, it was easy enough to go into Central Administration and simply change the service account that is used for the SharePoint Search Service to the same one that is being used to run the script. 

The challenge here, is that if we use our typical install methodology with SharePoint that means that the account that is configured to run the SharePoint Search Service is not an administrator – but to run these SSL scripts for FAST you must be using an administrator account.  It isn’t surprising that this misconfiguration happened.

What is surprising is that after initial configuration, this wasn’t an issue.  In looking at the crawl logs, everything seemed to be fine until there was a password change. There could have been some strange order of operations thing – but I thought I’d mention that in case someone else runs into the issue.

For more information on the issue, the post that helped me solve this one came from here:

http://social.technet.microsoft.com/Forums/en/sharepoint2010setup/thread/1b8efd93-f22d-4f2e-9f32-2d22f489c0f6

For more information on Creating and setting up the Content Search Service Application:

http://technet.microsoft.com/en-us/library/ff381261.aspx

Managing certificates (FAST Search Server 2010 for SharePoint)

http://technet.microsoft.com/en-us/library/ff381244.aspx